MAR 2026
DITHERED MOUSE TRAIL
The goal
After I finished the design for the about section for the portfolio I still felt that something was missing, I added the noise texture in the background that I liked because it reminds me of the grip texture that Xbox controllers have and still something WAS MISSING. I wanted something that reacted to my movement, something extremely interactive, not just something that scaled up/down on hover or added a simple shadow. The about section already talks about "grain, dithering, generative graphics", so the effect needed to echo that theme.
I wanted it to be subtle to not steal any attention away from the content (although it still might), I wanted it to dissolve into nothing in a patterned way that just satisfies my brain. I wanted it to be brush-like, the trail should lag like a very long brush being dragged across the canvas.
The canvas setup
The trail lives on a <canvas> element that is positioned over the about section and takes up the whole space.
NOTE: make sure to include pointer-events: none on the canvas so you don't waste hours like me trying to figure out why input is all of a sudden not registering and thinking all your events are broken :)
mixBlendMode: "screen" will make it so that our dark background is brightened, rather than paint something on it and have it look flat.
To keep the canvas in sync with its parent dimensions, we use a ResizeObserver (don't worry, it's my first time hearing about it too).
const syncSize = () => {
  canvas.width = parent.offsetWidth;
  canvas.height = parent.offsetHeight;
};
const ro = new ResizeObserver(syncSize);
ro.observe(parent);
The brush lag
What I see commonly in these trail designs on other websites is that they feel like brushes gliding across a canvas, they have inertia, the mouse drags the trail.
Now here is where I used something from my game development days:
Lerp (linear interpolation), A mathematical equation that make it so every animation frame, the trail will move slowly toward the cursor position to get that drag :
trailX += (mouseX - trailX) * 0.1;
trailY += (mouseY - trailY) * 0.1;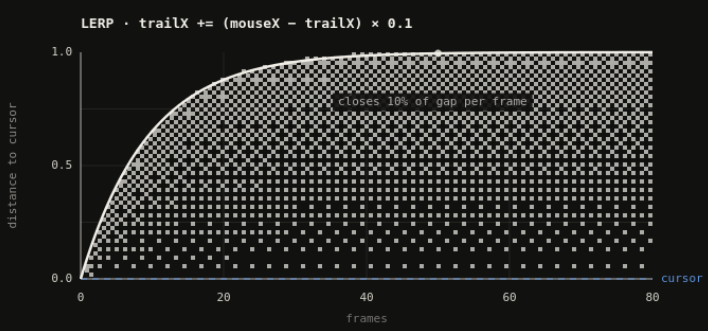
LERP being 0.1, the brush closes 10% of the remaining gap each frame. When the mouse is far away, the brush will approach fast, if the mouse is closer, it slows down.
This produces an exponential ease-in (WHICH I LOVE) the brush accelerates out of rest and decelerates into the cursor, exactly like a physical brush. Lower values mean more drag.
The mouse coordinates are updated by a mousemove listener on the parent element. The brush position is updated inside the render loop, every frame, regardless of mouse events. This decoupling is what makes the lag smooth, the brush always advances toward wherever the mouse currently is.
Recording the Trail
Every frame, the current brush position is recorded as a point in the trailArray BUT only if it has moved far away enough from the last recorded point (I set it to 3px for best results), this prevents stacking hundreds of identical points when we don't move the mouse (I damaged my laptop enough with this).
const last = trail[trail.length - 1];
const dx = trailX - (last?.x ?? trailX - 999);
const dy = trailY - (last?.y ?? trailY - 999);
if (!last || dx * dx + dy * dy > MIN_DIST * MIN_DIST) {
  trail.push({ x: trailX, y: trailY, life: TRAIL_LIFE });
}
NOTE: Each point has a "life" (time to dissolve), set to 80. Every frame I decrement these points and when it reaches zero it's removed from the Array. I'm running this at 60fps so a trailpoint will last 1.3 seconds.
What is Ordered Dithering?
Dithering is a technique used in digital imaging to create the illusion of more colors than are actually available, so instead of drawing a pixel at 50% opacity, every other pixel is drawn at full opacity such as the eye will perceive a middle grey.
I will bet you 1 dollar you wont find a single gray pixel in this image:
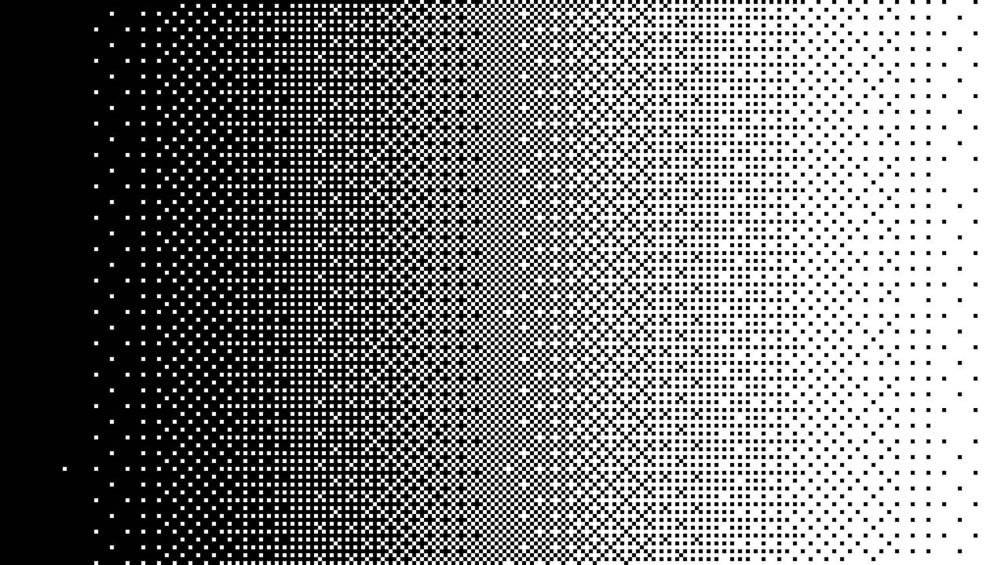
Bayer dithering does this systematically using a threshold matrix:
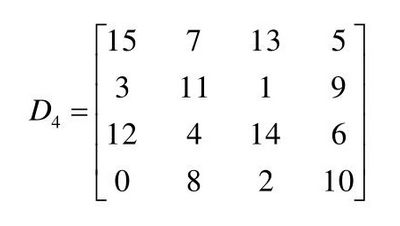
Each cell holds a value (0-15). We want to use this to decide whether to draw a pixel at position (x, y) with an opacity (0-1):
First we look up the cell:
threshold = BAYER4[y % 4][x % 4] / 16We find the remainder of 4 because we have a 4x4 grid, so coordinates repeat every 4 pixels, for any pixel at position (x, y)
Now, I hadn't touched matrices in school so this took me a second but here's how it clicked for me:
Think of the matrix as a tiny 4×4 floor tile. Your entire canvas is a huge floor, and that tile gets repeated across the whole thing left to right, top to bottom like wallpaper. Every pixel on that floor is standing on some copy of the tile, and it always lands on exactly one of the 16 cells.
The %4 is just how you figure out which cell. If a pixel is at x=9, then 9 % 4 = 1, meaning it lands on column 1 of the tile, because 9 is one step past the second full repetition of 4. Same idea for the row using y % 4. You end up with a row and a column, you look that cell up in the matrix, and that's your threshold.
Then you divide by 16 to turn the value (which is 0–15) into a decimal between 0 and 1, so it's comparable to your opacity t.
So if t > threshold, draw the pixel. Otherwise you skip it!
at t = 1, every pixel passes:

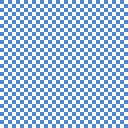
at t = 0.5, only the pixels whose threshold is below 0.5 pass (half of them, gives us a checkerboard):
at t = 0, nothing, shocking right?
Transitioning from t = 1 to t = 0 smoothly might give us that Disintegration effect that I was looking for!
Rendering with Dithering
Now, I left this for last, this is where you see your hard thinking and work pay off. Each frame, every point in the trail is drawn as a small circular "cluster" of pixels. The Bayer matrix will decide which blocks are visible:
const t = (life / TRAIL_LIFE) ** 2I made it to the power of two so that the curve gets bigger, the trail stays brighter for longer and then dissolves quickly.
For each point, we iterate over a grid within a circular boundary:
for (let row = -TRAIL_R; row <= TRAIL_R; row += PIXEL_SIZE) {
  for (let col = -TRAIL_R; col <= TRAIL_R; col += PIXEL_SIZE) {
    const dist2 = col * col + row * row;
    if (dist2 > TRAIL_R * TRAIL_R) continue; // stay within circle
    const radialT = t * (1 - (dist2 / (TRAIL_R * TRAIL_R)) * 0.6);
  }
}
radialT is the effective opacity for this specific block. Blocks near the edge of the circle get a reduced radialT (multiplied by up to 0.4 at the very edge). This makes the edges of each dot softer, they dither away sooner than the center.
Next is the Bayer opacity test we described earlier:
const bx = (Math.floor((x + col) / PIXEL_SIZE) % 4 + 4) % 4;
const by = (Math.floor((y + row) / PIXEL_SIZE) % 4 + 4) % 4;
const threshold = BAYER4[by][bx] / 16;

if (radialT > threshold) {
  ctx.fillStyle = `rgba(245,245,245,${0.28 * radialT})`;
  ctx.fillRect(Math.round(x + col), Math.round(y + row), PIXEL_SIZE, PIXEL_SIZE);
}
I had a problem handling negative inputs. adding + 4) % 4 handled it because % can apparently sometimes return negative values (JavaScript being JavaScript)
Conclusion
This has been a beast to think about, to understand, to learn but it has also been extremely fun. I used AI when I hit walls or needed something explained and I encourage you to do the same, it really does boost learning. Thank you for reading my article and I hope I can even see this in application on your own website!
peace